Creating a Flat File Connector Account Store
Flat File Connector Process Flow
The Flat File Connector follows a structured process that enables EmpowerID to import, process, and export identity-related data from flat files. This section explains each step in detail, from initial data extraction to ongoing synchronization between EmpowerID and the external system.
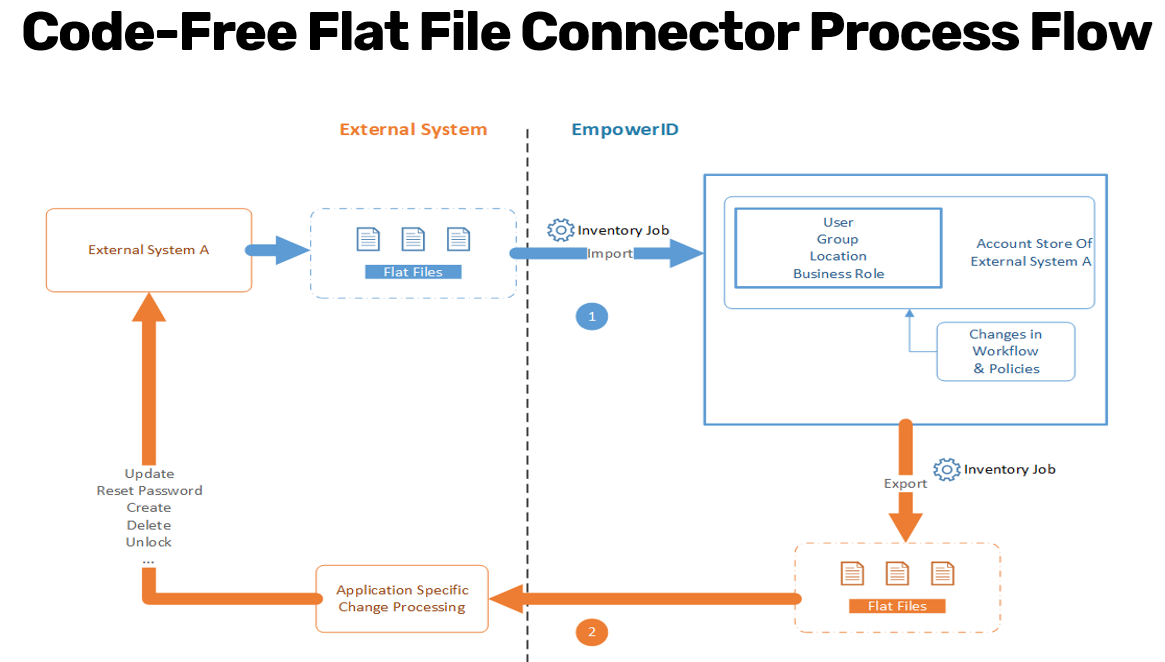
1. Export Data from the External System
The first step in the process involves extracting identity and group data from the external system into flat files. This data must be placed in a designated file system location where EmpowerID can access it.
- The external system must generate flat files (CSV or text-based) containing user, group, role, location, and membership information.
- These files should be formatted according to EmpowerID's schema mapping requirements, ensuring each record has a unique identifier that never changes.
- The exported files must be stored in a location accessible by EmpowerID, such as:
- A shared network drive.
- A Secure FTP (SFTP) server.
- A cloud-based file storage location (if using Cloud Gateway).
2. Create the Flat File Account Store in EmpowerID
Once the external system has exported the required flat files, the next step is to create an account store in EmpowerID using the Create Universal Flat File Connector workflow.
- This workflow defines an account store using the flat file as its data source.
- The administrator specifies configuration settings such as:
- Sync Direction (Inbound only or Bidirectional).
- File Paths for the source files.
- Schema Mapping File to define how source attributes map to EmpowerID attributes.
- Primary Key (ensuring each record has a unique, immutable identifier).
- Date & Time Formats (must be consistent across all date fields).
- File Delimiters (Comma, Semicolon, Pipe).
- Mandatory Fields (records missing these fields will be rejected).
- Error Handling & Notifications (emails can be sent for failed records).
Once the workflow completes, the account store is created, and EmpowerID is ready to begin inventorying the data.
3. Inventory Jobs Process the Flat File Data
After the flat file account store is created, EmpowerID's inventory jobs treat the flat file account store like any other account store and process the data accordingly.
- The inventory job reads the user, role, group, location, and membership files and imports them into EmpowerID’s internal tables.
- EmpowerID applies identity processing workflows, such as:
- Correlating accounts with existing users.
- Provisioning new users if they do not already exist.
- Assigning roles and locations based on imported data.
- Populating group memberships.
- Data is stored in key EmpowerID tables, such as:
- Users Table – Stores imported identity records.
- Groups Table – Stores imported groups.
- Locations Table – Stores imported locations.
- Business Roles Table – Stores business roles assigned to users.
If errors occur (e.g., missing required fields or duplicate records), they are logged, and notification emails can be sent to administrators.
4. Processing Data and Applying Changes in EmpowerID
Once the data is inside EmpowerID, the system processes it through various built-in workflows and policies. These include:
- Provisioning policies that create accounts in downstream applications if necessary.
- Attribute synchronization rules that update identity attributes across linked systems.
- RBAC (Role-Based Access Control) policies that assign roles and permissions to users based on their attributes.
- Workflow-driven updates that modify user records based on business rules.
EmpowerID continuously monitors these records, and any updates made within EmpowerID are queued for export if the account store is configured for bidirectional synchronization.
5. Exporting Updated Data from EmpowerID
If bidirectional sync is enabled, EmpowerID generates updated flat files containing identity changes. This process ensures that the external system remains synchronized with EmpowerID.
- The inventory job creates export files containing:
- Updated Users
- New or Modified Groups
- Group Membership Changes
- These files are placed in the configured export location, such as:
- A file share.
- An SFTP location.
- A cloud-based storage location.
The format of these files follows the structure required by the external system.
6. External System Updates
Once EmpowerID exports the updated files, it is up to the external system to process them and apply the changes to its internal records.
- The external system must have change processing logic to:
- Import the EmpowerID-generated files.
- Update its internal user, group, and role records accordingly.
- This step ensures that the external system reflects changes made within EmpowerID.
7. Continuous Synchronization
The flat file synchronization process is repetitive and continuous:
- Each time the external system generates a new set of flat files, EmpowerID will detect and inventory them.
- The EmpowerID inventory job compares the new file with the previously imported file:
- If the files are identical (same hash), no changes are processed.
- If the files are different, the new data is imported, and the system applies any necessary updates.
- If bidirectional sync is enabled, EmpowerID will export any changes back to the external system.
By following this structured process, EmpowerID ensures that identity data remains consistent and up to date across both the external system and EmpowerID itself.
Flat File Connector Source Files
The Flat File Connector processes multiple source files to import identity-related data into EmpowerID. Some of these files are required, while others are optional depending on the configuration of the external system. Each file must follow specific formatting rules to ensure seamless integration.
1. User File (Required)
The User File contains the source data for identities in the system. These records represent the user accounts that need to be brought into EmpowerID.

Key Requirements:
- Each record must include an attribute that uniquely identifies the account.
- This unique identifier must never change (e.g., employee ID, UUID, or another immutable attribute).
- The file must contain a header row with column names.
- Additional user attributes, such as names, email addresses, and department information, can also be included.
2. Company File (Optional)
The Company File defines the organizational locations that can be imported and used as business locations in EmpowerID.
Key Requirements:
- This file is optional but useful for organizations that require hierarchical location data.
- It allows EmpowerID to associate users with specific business locations.
- The location names and structures must be consistent with the business's organizational model.
3. Role File (Optional)
The Role File contains source data that defines the organizational roles that can be used as business roles in EmpowerID.
Key Requirements:
- This file is optional but helps in structuring role-based access control (RBAC) in EmpowerID.
- Each role should have a unique identifier to ensure consistency.
- Business roles can be mapped to locations and users within EmpowerID.
4. Group File (Optional)
The Group File defines security or distribution groups that exist in the external system.
Key Requirements:
- This file is optional but necessary if groups and memberships need to be managed in EmpowerID.
- Each group must have a unique identifier that never changes.
- Group names alone cannot be used as a unique identifier because names can change.
- If a group name changes but does not have a persistent identifier, EmpowerID will create a new group instead of updating the existing one.
5. Membership File (Optional)
The Membership File provides group membership information, specifying which users belong to which groups.
Key Requirements:
- This file is optional but required if group memberships need to be tracked and managed in EmpowerID.
- The file contains two essential columns:
- The account ID (linking a user to their identity in EmpowerID).
- The group ID (associating the user with a specific group).
- The account and group IDs must match the unique identifiers used in the User File and Group File, respectively.
6. Schema Mapping File (Required)
The Schema Mapping File defines how data from the source files maps to attributes in EmpowerID.
Key Requirements:
- This file is critical for the connector workflow, allowing EmpowerID to interpret and correctly map source file columns.
- The schema mapping file contains mappings between:
- The column names in the source file.
- The person security boundary attribute names from EmpowerID’s Person component.
- The account object attributes in the EmpowerID Account component.
- The RBAC object attribute names, ensuring proper integration with EmpowerID’s Role-Based Access Control framework.
- A common example is mapping a Manager ID from the external system to EmpowerID’s Manager Distinguished Name.
- The mapping file also controls attribute flow direction and allows for custom attribute flow handlers if needed.
- This mapping file is only used once when the connector is first run. Any future changes to attribute mappings must be made via:
- The Manage Schema page in the EmpowerID web UI.
- Workflow Studio.
- Running the Refresh Attribute Flow Schema for Account Store workflow.
Each of these files plays a specific role in the flat file connector process, ensuring that user identities, groups, roles, and memberships are accurately represented within EmpowerID.
Schema Mapping File
The Schema Mapping File is a critical component of the Flat File Connector configuration. It defines how the data in the source files maps to attributes in EmpowerID’s identity model. This mapping ensures that each column in the source file is correctly associated with its corresponding attribute in EmpowerID, enabling proper correlation, provisioning, and synchronization of identity data.
Purpose and Role of the Schema Mapping File
- Provides column-to-attribute mappings between the external system and EmpowerID.
- Ensures data consistency when importing users, roles, groups, and memberships.
- Defines how EmpowerID should interpret and transform the imported data.
- Specifies attribute flow information, including directionality (import, export, or bidirectional).
- Identifies custom attribute flow handlers that modify or enrich data before storage.
Structure of the Schema Mapping File
The Schema Mapping File is typically a CSV file containing the following key columns:
-
Source File Column Names
- These represent the names of the fields in the external system’s flat file.
- For example, if the user file contains a column labeled
"EmpID", it needs to be mapped to the appropriate EmpowerID attribute.
-
Person Security Boundary Attribute Name
- This column maps the external system’s data to EmpowerID’s Person component.
- It defines how user-related attributes such as First Name, Last Name, Email, and Manager are linked to EmpowerID.
-
Object Attribute Name
- This column represents attributes from the EmpowerID Account Component.
- It ensures that user accounts, roles, and group memberships align with EmpowerID’s account model.
-
RBAC Object Attribute Name
- If the attribute applies to EmpowerID’s Role-Based Access Control (RBAC) framework, this column maps the external field to RBAC-related attributes.
- For example, an external
"Manager ID"might be mapped to the EmpowerID attribute"Manager Distinguished Name".
Example of a Schema Mapping File

Key Considerations for the Schema Mapping File
-
Unique Identifiers
- The mapping must include a unique, immutable identifier for each user account.
- Changing the unique identifier in subsequent files can result in duplicate records.
-
Mapping Manager Attributes
- If the external system has a Manager ID column, it should be mapped to EmpowerID’s Manager Distinguished Name attribute.
- The manager mapping must reference a valid unique identifier in the same file.
-
Attribute Flow Direction
- The Schema Mapping File defines whether attributes flow into EmpowerID (import), flow out to the external system (export), or support bidirectional updates.
-
Custom Attribute Flow Handlers
- EmpowerID allows custom handlers to modify attribute behavior during import/export.
- If specific transformations are required (e.g., formatting changes, concatenations), they can be defined in the schema.
Usage of the Schema Mapping File in EmpowerID
- The Schema Mapping File is used only once when the Flat File Connector is first configured.
- If attribute mappings need to change after initial setup, they must be modified through:
- The Manage Schema page in the EmpowerID Web UI.
- Workflow Studio (for advanced modifications).
- Running the Refresh Attribute Flow Schema for Account Store workflow.
Modifications and Updates
- If the Schema Mapping File is modified after the initial import, EmpowerID does not automatically reprocess it.
- Any changes must be manually applied using the attribute mapping management tools in EmpowerID.
- The updated mappings affect all subsequent inventory jobs but do not retroactively update previously imported records.
By defining precise attribute mappings, the Schema Mapping File ensures that identity data is accurately transformed and synchronized between the external system and EmpowerID.
Creating a Flat File Account Store
To integrate an external system's identity data into EmpowerID using flat files, you must create a Flat File Account Store. This process involves defining the account store, specifying file paths, mapping attributes, and configuring inventory settings. Once set up, the flat file account store functions like any other account store in EmpowerID, enabling seamless data import and synchronization.
Accessing the Flat File Connector Workflow
- Navigate to Admin → Account Stores and Systems.
- Run the workflow Create Universal Flat File Connector.
This workflow guides you through setting up the account store, specifying key configurations, and mapping data fields.
Configuring the Flat File Connector
The workflow presents several options that define how the flat file connector operates. These include synchronization direction, file locations, attribute mappings, and error handling configurations.
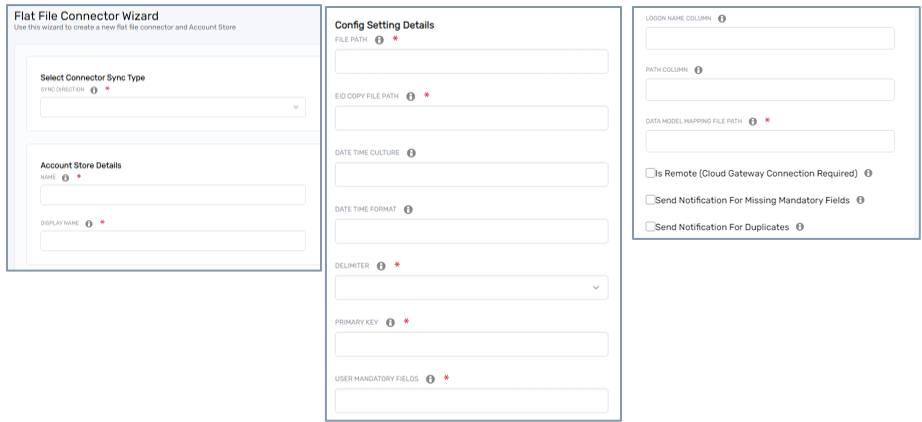
1. Sync Direction
The first step is to choose the sync direction, which determines how data flows between EmpowerID and the external system:
- Inbound (Import Only): The system only imports data from flat files into EmpowerID.
- Bidirectional (Import & Export): EmpowerID imports data and also exports changes back to flat files when updates occur.
For this setup, we will use Inbound as the sync direction.
2. Naming the Account Store
You must specify:
- Account Store Name – The internal name used by EmpowerID.
- Display Name – A user-friendly name visible in the admin interface.
For example, if importing HR data, you might use:
- Account Store Name:
HR_Worker_File - Display Name:
HR Worker Flat File
This naming helps easily identify the account store in the EmpowerID admin interface.
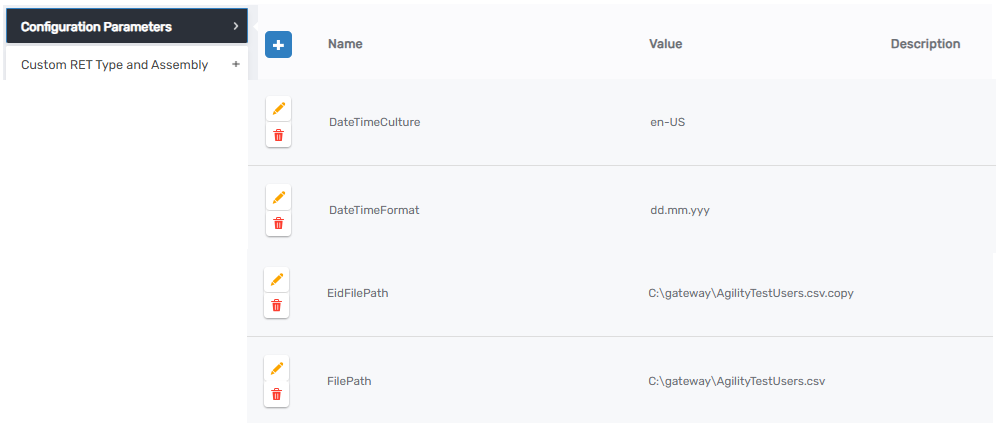
3. Defining File Paths
The system requires two file paths:
- File Path – The location where the source flat files are stored.
- EID Copy File Path – The location where EmpowerID stores a copy of the last processed file.
The EID Copy File Path serves as a reference for change detection:
- Whenever an inventory job runs, EmpowerID compares the new file’s hash value with the previously stored file.
- If the files are identical, no changes are processed.
- If the files are different, the system triggers an update.
This mechanism ensures that EmpowerID only processes new or updated records.
4. Date and Time Formatting
EmpowerID requires a valid date-time format to properly interpret date values in the file. You must specify:
- Date Time Culture – Defines the locale settings (e.g.,
English-US). - Date Format – The format used in the file (e.g.,
MM/dd/yyyy).
Important Notes:
- All date fields must follow the same format since only one format can be specified.
- Use capital 'M' for months to avoid confusion with minutes (
MM/dd/yyyyinstead ofmm/dd/yyyy).
5. File Delimiter Selection
EmpowerID supports different file delimiters to match the format used in the source flat file:
- Comma (,) (default CSV delimiter)
- Semicolon (;) (commonly used in European formats)
- Pipe (|) (alternative delimiter)
Choose the delimiter that matches your data source.
6. Defining the Primary Key
The Primary Key uniquely identifies each record and must never change. This key is essential for correlation and identity matching.
Examples of valid primary keys:
- Employee ID
- UUID (Universally Unique Identifier)
- Account ID
If a record’s primary key changes in the source file, EmpowerID will treat it as a new account, which may lead to duplicate user entries.
7. Mandatory Field Validation
EmpowerID allows you to specify mandatory fields that must be present in every record. If a record lacks any of these required fields, it is rejected during processing.
Examples of mandatory fields:
- First Name
- Last Name
- Email Address
- Logon Name
If a record is missing a mandatory field, EmpowerID:
- Skips processing the record.
- Logs the issue.
- (If configured) Sends a notification email to administrators with details of rejected records.
8. Logon Name & Path Column Configuration
- Logon Name Column – Defines the attribute used for user authentication.
- Path Column – If the external system has an OU structure or location hierarchy, it can be mapped to EmpowerID’s path attribute.
9. Schema Mapping File Selection
At this stage, you must upload the Schema Mapping File, which defines how the attributes in the flat file map to EmpowerID’s identity model.
10. Remote Connectivity (Optional)
If the system is connected through Cloud Gateway, specify that the data source is remote.
Error Handling and Notifications
EmpowerID provides configurable notifications for missing mandatory fields and duplicate records to ensure administrators are alerted about data issues.
1. Handling Missing Mandatory Fields
- EmpowerID can reject records missing mandatory attributes.
- Administrators can configure EmpowerID to:
- Send an email notification when records are rejected.
- Generate an Excel file listing rejected records.
2. Handling Duplicate Records
- Duplicate detection ensures that users and groups are not created multiple times due to repeated records in the source file.
- Duplicate records are logged, and alerts can be sent to administrators.
General System Settings
The Flat File Connector Account Store shares configuration settings with other account stores in EmpowerID.
Key settings include:
- Provisioning Policies – Determines whether users are provisioned into other systems.
- Inventory Processing – Defines how external roles, locations, and groups are managed.
- Lifecycle Management – Controls deprovisioning, expiration, and cleanup processes.
Completing the Setup
Once all fields are configured, click Next to create the Flat File Connector.
At this point:
- The account store appears in the EmpowerID Admin Console.
- It looks and behaves like any other account store.
- Inventory jobs process new records based on the defined schedule.
Verifying the Configuration
Once the setup is complete:
- Navigate to the Account Store List – The newly created Flat File Account Store will be displayed.
- Open the Account Store Settings – The settings include:
- Lifecycle & provisioning settings.
- Business role and location settings.
- Group settings.
- Inventory & membership process settings.
- Check the Resource System Tab – Displays key configuration values such as:
- Date format.
- Primary key.
- File paths.
- Logon name column.
If any settings need adjustment, they can be modified directly from the Resource System Tab.
Monitoring and Troubleshooting
Once the Flat File Account Store is active:
- View Inventory Job History to track processed files.
- Inspect Imported User Accounts and Groups to verify data accuracy.
- Check the Error Logs for rejected records and validation failures.
If adjustments are needed:
- Modify schema mappings in the Manage Schema page or Workflow Studio.
- Update file paths or date formats from the Resource System Tab.
- Re-run the inventory job to process new files.
Conclusion
Creating a Flat File Account Store in EmpowerID provides a flexible, code-free way to integrate external identity data. Once configured, the system continuously processes new flat files, synchronizes identities, and ensures data consistency between EmpowerID and the external system.
By following this structured setup, administrators can ensure efficient data import, error handling, and ongoing identity synchronization.